Tuesday 31 January 2012

Silver and White

Good afternoon everyone

This morning I decided I was going to play with a stamp I bought some time ago but have never used.  I did try it out briefly when I got it but was very disappointed that the stamped image looked as though the ink was "bubbled".  Some time later I heard that sometimes this is a problem with acrylic stamps and that the solution was to sand it lightly.  Hmmm, not sure whether that was a good idea - after all I didn't want to destroy the stamp altogether!  So I just left it.  Then last week I saw another, far more acceptable tip, which was to take sellotape over the surface then ink it up with Versamark and allow it to dry before using (thank you Ali Watson!)  So I reckoned I had nothing to lose by trying it and it seems to have worked because there was no "bubbling" when I tried it this morning. This is  large corner stamp and, on reflection, I think I was being a bit adventurous trying it out because it requires a large acrylic block and I discovered that it put quite a strain on my poorly wrist.  However, I perservered and ended up with this card.


I used Neenah card from Crafters Companion to stamp onto and silver pigment ink (think it is Encore).   The card base is 7x5 pre-scored card.  I would be very interested to hear what everyone else thinks of this as I am not too sure about it.  Firstly I think it would probably be better suited to a wedding or silver wedding rather than a birthday but I had decided I wanted to stamp the sentiment in a square for the centre of the card and I only have birthday, thinking of you and Christmas stamps like this!  Secondly, it took me about ten attempts to get the square almost straight and eventually I realised that the stamp itself is actually slightly out of line - the happy and birthday are at different levels on one side which is why I couldn't get a perfect square.  Here's a close up


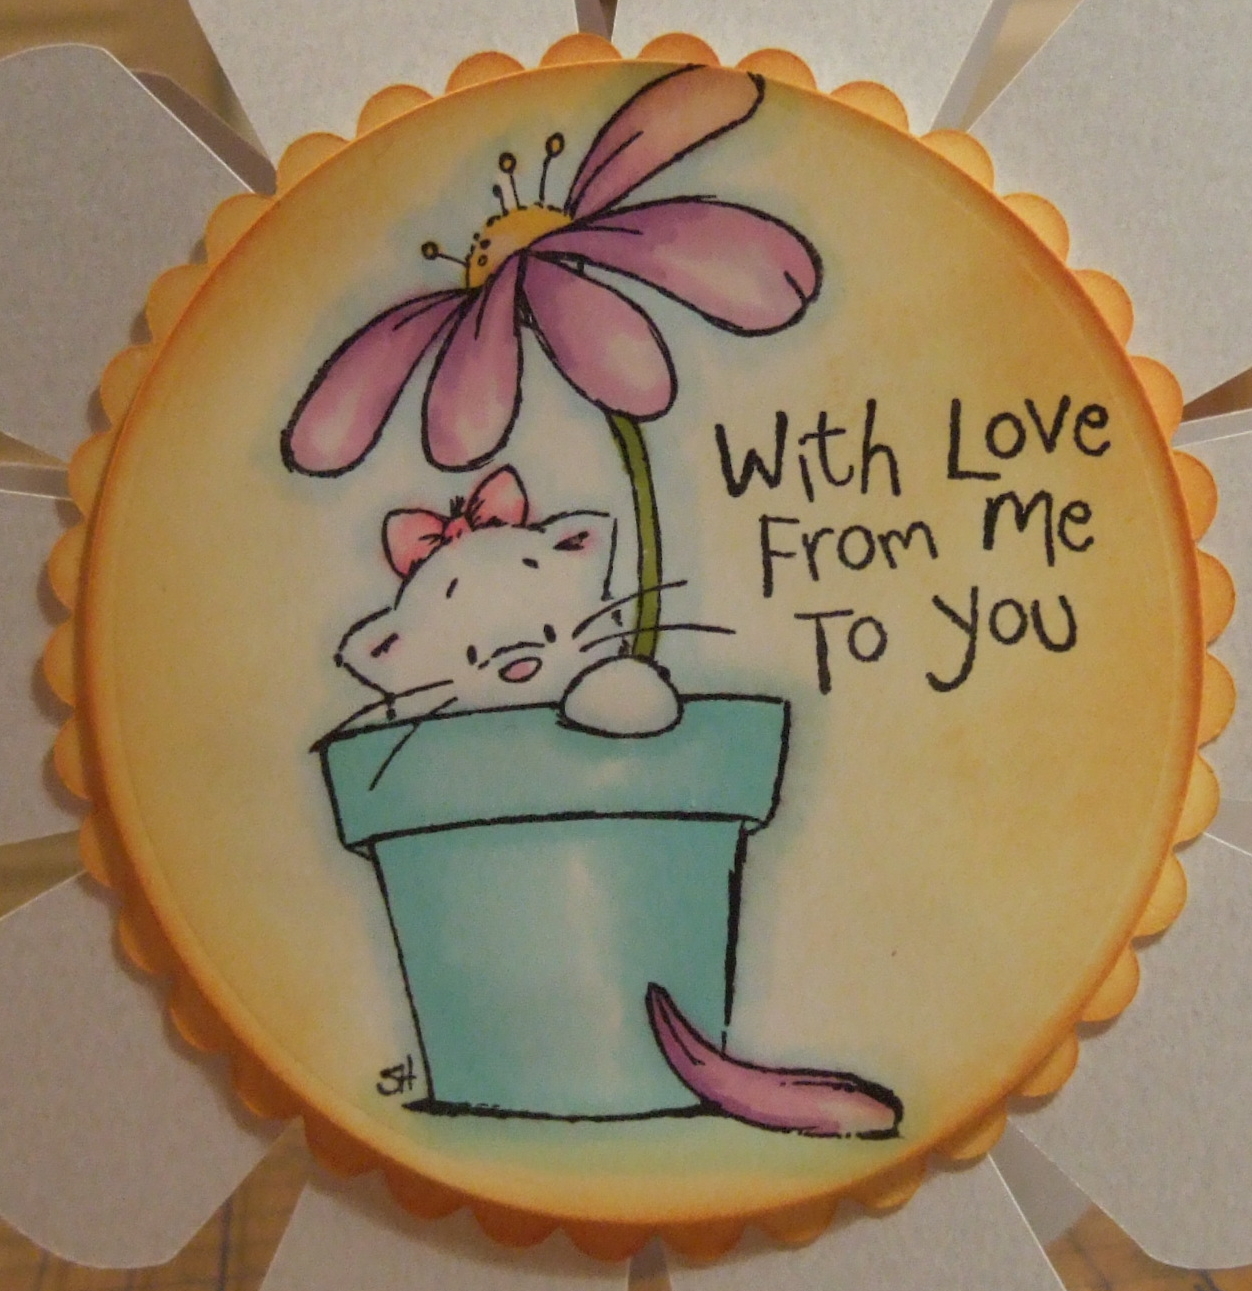
Not the best photograph I'm afraid.  Anyway, this is my card for today.

Thank you for calling in.

Catherine x

Monday 30 January 2012

Busy Doing Northing

Afternoon folks

This morning I headed up to my craft room quite early - decided everything else could wait because I wanted to play.  I spent a very happy hour or two messing about and then settled down to actually make a card.  I recently bought one of Sheena Dougass' "Little Bit Sketchy" stamps (Busy Doing Nothing) from Crafters Companion and managed to cut it out last night so decided to use that today.

I stamped the image onto some Elegance Satin paper from Joanna Sheen, coloured it using my ProMarkers and cut it out using a Spellbinders nestie.  I intended to spray it with Spray and Shine from Crafters Companion but picked up the wrong can so it ended up being Spray and Sparkled instead!

Here is the finished card


I have used Tim Holtz distressing ink in milled lavender around the edges of the oval and dusty concord along the cut edge before mounting it onto yellow card also cut with a Spellbinders nestie. The yellow patterned backing I made when I was messing around - I inked up an embossing folder before embossing a piece of Neenah card.  I then dusted over the surface with some pearlescent Cosmic Shimmer mica powder, though it's difficult to see on the photo.  Here is a close up


Finally I embossed a piece of Coredinations card from Crafters Companion using a "Special Touch of Mica" mask (ivy) and lightly sanded it back to form the other piece of the backing.  Overall I am quite pleased with this card and hope you like it too.

Thank you for visiting my blog.

Catherine x

Sunday 29 January 2012

First Strawberry Kisses Card

Good evening everyone

Well, I managed to get into my craftroom this afternoon and decided to use my newest rubber stamp from the "Strawberry Kisses" range from Crafters Companion.  It's called "Flower Power".  I coloured it using mainly FlexMarkers with only the yellow done in ProMarker.  Here's the card I made when I had coloured it:


The flower shaped card base is made from Centura Pearl from Crafters Companion and I cut this out using my Cameo.  The image is stamped onto Neenah Card, also from Crafters Companion and both the circle and scalloped circle that form the centre of the "flower" were cut using my Spellbinders nesties.  I coloured both using Tim Holtz distress ink.  This was the second image I coloured - I had a little accident with the first one when I stamped the sentiment onto it - the sentiment stamped beautifully but there was obviously some ink on the edge of my rocker block and I ended up with a long black line right through the image!  Grrrr!  Good job I had stamped the image out twice to start with!

Here's a close up of the topper


I think I must be a bit odd because I really wanted the card to have the overall appearance of a flower with a yellow centre!

Thank you for calling in.

Catherine x

Saturday 28 January 2012

Friendship is the Breathing Rose

Good afternoon folks

Well, last night I vowed to tidy up my craft room as I was down to about 6 square inches of working space so I spent a lot of time today doing just that.  I wouldn't say the room was pristine when I finished, far from it, but at least I had space to work in.  And of course once I was in there I needed to do something.  I decided I would make a reasonably quick card though as playing time was getting short, and so I took another of my flower photographs, which I had already played around with in Craft Artist, printed it and turned it into an easel card.


This card is made from a 15cm square card base and I have used a lavender coloured smooth card from Craftsite, a pink foil paper I bought years ago from Create and Craft, and some deep pink Stardream paper for the matting and layering.  I used a rose embossing folder on the lavender card behind the topper, printed the sentiement onto plain white paper and then cut it and another piece of lavender card using dies.  The ribbon and the gems are from my stash.  I think I need to add another little embellishment in front of the sentiment.

Here is the original photograph


I wish I could say that I had also grown this rose myself, but unfortunately I can't - it was included in a bouquet.

Thank you for dropping by.

Catherine x

Friday 27 January 2012

Blossom Card

Good afternoon everyone

This afternoon I have made a very quick card using a photograph I took a couple of years ago.  I started to play around with some of my flower photographs in Craft Artist last week and used one of them for this card.  I have added the text direct to the photograph.  The card itself couldn't have been more straighforward to make and just took minutes.  Faffing around deciding which photo to use and what text to add to it took forever!


The card base is a 15x15cm pre-scored card and I have used Stardream paper in brown and bright pink to layer the photograph onto.  The flower photo was printed onto Joanna Sheen's gentle gloss paper.  The piccie of the card isn't the best because I had to turn it away from the light due to the reflection on the gentle gloss card!

Here is the original photograph


I have lots of flower photographs stored on my pc - some are quite good and others not so good.  When I first started out making my cards I used a lot of my own photographs in my little £5 cardmaking software and made purely printed cards.  After a while I started to add a little piece of ribbon here or a flower there - and look at me now!

Thank you to Chris at Crafting Heaven for posting a pic of a card she made using one of her own flower photographs for inspiring me to get cracking on this!

Thank you for visiting my blog.

Catherine x

Thursday 26 January 2012

SWALK Daydream Believer

Good evening everyone

As some of you will probably already know, on Tuesday afternoon I got my pot off my right wrist, nuch to my relief.  However after seven weeks of being held in one position my wrist joint is extremely stiff, to say the least, and actually quite painful when I try to move it in certain ways.  I was told I needed to have physio for six weeks and although the referral sheet was marked as urgent I am still waiting for them to contact me with an appointment!  In the meantime I have been "trying out" my hand to see what I can and can't manage to do - much to my disgust I found I was now able to do the washing up!  As long as I don't actually have to scrub the pots, that is!  Anyway, another thing I decided to try was to use my ProMarkers.  I found an image I had stamped out in December before I did the dreaded deed of breaking my wrist and gave it a go yesterday afternoon.  And I was very relieved to find that I was able to colour it.  So of course what else was I supposed to do with the image once it was done but turn it into a card.  So without further ado, here it is:


The stamp is "Daydream Believer" from the SWALK range and is stamped onto Neenah card both from Crafters Companion, and the backing paper is from one of my Joanna Sheen cds.  I used Tim Holtz distress ink "stormy sky" and a shaving brush to lightly colour the edges of the topper which was cut using a Spellbinders nestie. The blue linen effect card was embossed with a daisy embossing folder and it, the  pink ribbon and flowers are from my stash.  I have yet to add a sentiment and insert. 

Hmmm, wonder what else crafty I can try out my hand on tomorrow?

Thank you for dropping in.

Catherine x

Monday 23 January 2012

Zodiac Card

Evening everyone

The challenge over at the CD Sunday Challenge Blog this week is Zodiac.  Now this is not something that normally interests me - I don't even read my horoscope - so the theme is definitely out of my comfort zone.  However, I then remembered that there was something zodiac themed on Rob Addam's cd "Big Cards" so thought I would give it a go.  My own star sign is Libra so that was what I chose to use on this card.

I made the black card base from smooth skin truly black card from Craftsite and layered more black card and gold card before adding the sun ray backing paper from the cd.  The corner zodiac circle embellishments and the layered topper are also from the cd.

So there you have it - my first ever zodiac themed card.

Thankyou for visiting my blog.

Catherine x

Sunday 22 January 2012

Love Card

Hello everyone

Today I have made a different sort of card - well different for me anyway.  It is a DL card and I designed it on my Craft Artist solely from digikits.  I made the letters myself in Craft Artist.  Here is what it looks like in Craft Artist:


As I decided I was going to cut out and layer up the "Love" hearts, I decided to err on the side of caution and printed everything else direct to card.  I printed "Love" again separately and then took a deep breath and picked up a small pair of scissors.  It took me a long time but, with plenty of breaks to rest my wrist, I manged to do it.  Then I realised I had to cut the central heart out of the "e"!  So armed with my small scissors again, and my craft knife......  It was at this point that I started to consider how I would manage with my right wrist in a plaster cast and the end of one of my fingers on my left hand missing!  But all was well, if extremely slow and arduous (though perhaps a little rough around the edges!)  So here is the card printed and made up:


I have decided to enter this card into this weeks challenge at Auld Sentiments Challenge Blog which is to make a card with the word "Love" on it.

Thank you for calling by.

Catherine x

Saturday 21 January 2012

Frogs and Snails

Good afternoon everyone,

Today I have made up a card using the Frogs and Snails image from the "Now Decoupage" cd by La Pashe, which can be found in the "Framin Cards" section set 2.  I teamed the image with a different frame from the one made for it as I wanted a slightly different colour and took both into Craft Artist to fit them together before printing them onto gentle gloss paper from Joanna Sheen.  I also used the kite element from the cd and cut that out digitally in Craft Artist before adding it to the backing paper which was from a digikit, as were the buttons.  The sentiment was also made using Craft Artist.  I had already cut out a card base from green Coredinations on my Cameo, using a cutting file from the Silhouette online store, but decided to use just the front of this as a mat.  I sanded the cut away edges as best I could with my left hand (had a bit of an accident, I have to say, and had to resort to some glue to do a quick repair job!)  I layered this onto some red paper and then added it all to a pre-scored white 15cm card base.  Enough waffle - here is the finished card


And here is a close up of the framed image, which I think is rather sweet!


 So it has turned out to be a very bright and colourful card.

Thank you for visiting my blog.

Catherine x

Friday 20 January 2012

Little Faye Whittaker card

Good evening everyone

Well I seem to have lost most of today, between accompanying hubby to his optician's appointment this morning and then spending the afternoon backing up and tidying up files on my laptop (long overdue!)  So now I am trying to catch up with myself.  Anyway here is the second little card I made on Wednesday.


I decided to try out another file I bought from the Silhouette online shop for this card base, which I cut from snow white Centura Pearl from Crafters Companion on my Cameo and it cut really well.  I then went looking for an image to add to it so used one from Joanna Sheen's Faye Whittaker cd.  The complete card front was done in Craft Artist as by the time I had layered up my previous card I didn't think my wrist would be good for a second one straight away.  So the flourishes, bows and lace are all from Daisy Trail digikits.  I added two strips of red paper down either side of the inside card back so that when the card is closed it shows through the cut-outs on the front.

Thank you for dropping in.

Catherine x

Thursday 19 January 2012

Cream and Gold layered card

Good morning everyone.

Well, it has been a little while since I last posted a card to my blog.  I will be very glad to get the pot off my wrist, which will be (hopefully) next week - and I can't wait.  Even though I can now use the fingers on my right hand again, the pot itself causes dexterity problems because I can't bend my wrist or grip smaller items.  So I have been spending time trying to get to grips with my Cameo machine and the Silhouette software, as well as doing some work on a family history project, which I am hoping to post to my family history page sometime after Easter.

When I got my Cameo at Christmas there was a $10 download card included so yesterday I went shopping in the Silhouette online shop and bought myself some cutting files.  Yesterday afternoon I saved the different layers from my chosen file to an sd card as I hadn't yet tried this function, and took myself off upstairs to make a card.  And here it is.


I used cream pearlised card from my stash and Anita's gold foiled paper to cut out the layers but as the cream card wasn't sturdy enough to make the base card I cut this from Centura Pearl card and overlaid the cream card on the front.  Then I added a gold outline peel-off to the central circle to complete it (and that was no mean feat, believe me!  It took about ten attempts to get it off the backing and into position due to my current lack of dexterity.)  I used Collal gel to stick the layers together and while I was waiting for them to dry I noticed that this weeks challenge on Crafty Bloggers Network is Monochrome so have decided to enter this card.

I did make a second little card yesterday and made a card base for a third, but I will post them separately, possibly tomorrow.

Thank you for visiting my blog.

Catherine x

Friday 6 January 2012

Canterbury Bell Card

Morning everyone

As promised in my post yesterday, here is the third card I made on Wednesday.  I didn't try any crafting yesterday as I needed to give my wrist a rest after making three cards the day before but am hoping I might manage some today.

The decoupaged image on this card is from my Flower Fairies cd by Crafters Companion and is the Canterbury Bell fairy.  I used my Cameo to cut it all out - the first time I have tried the print and cut facility.  I think I may need to practise tracing the outline to ensure accuracy but I was pleased with the result for a first attempt.  I did forget to trace the "landlocked" areas however, so have left those layers off my card as I can't cut them myself at the moment.  And here it is:

I cut the scalloped mat from Centura Pearl card and also printed and cut the sentiment using my Cameo and added some card candi to finish the card.

I designed a matching insert in my Craft Artist software, using an insert from the cd and then simply adding a "thumbnail" sized picture of the Canterbury Bell fairy myself.


 I will personalise and print the insert when I am ready to use this card.

Thank you for dropping in.

Catherine x

Thursday 5 January 2012

Silhouette Cards

Good morning all

Well I'm thankful to say the wind seems to have eased a bit this morning - it was quite frightening last night.  I thought my house was about to blow away!  I have just photographed some cards I managed to make yesterday so will post two of them now.

I headed off to my craftroom yesterday afternoon with the intention of trying the print and cut function on my Silhouette Cameo as I am still learning what it can do.  But as often happens with me, I got sidetracked and instead decided to see how well it cuts Coredinations card.  I chose two different colours to test it on, with the intention of making one card, but have to confess that I couldn't work out how to cut bits of the file whilst leaving others uncut so ended up with two cards, one being the reverse of the other, so to speak!

Card One:

The whole card, including the card base, was made from Coredintions card from Crafters Companion, which cut beautifully at the first attempt.  To cut the two mats I used gsd files from Coco Pop Art.  The oval mat was cut at the size on the file and I resized the rectangular one to fit an A5 card front.

Second Card:


I couln't decide on a sentiment for these cards so decided to leave it until I have some inspiration - if anyone has any suggestions for a generic sentiment that would fit then I would be pleased to hear them.

Sticking to my resolution to design the inserts at the same time I make the cards I did just that, using Craft Artist.  I will personalise the insert, print it and stick it in once I know who the recipient is going to be.  I decided to use the same insert for both cards, and here it is:

And just as a matter of interest, I did actually get around to trying the print and cut facility after I had made these two cards, but I will post the results separately, possibly tomorrow.

Thank you for calling in.

Catherine x

Tuesday 3 January 2012

Humphrey Card

Hello everyone

Happy New Year to you all.  I hope that this year brings each and every one of you good health and happiness, and whatever else you wish for yourself.  I hope you all had a good Christmas and that not too many of you succumbed to the dreaded sickness bug.  Tom and I had a lovely Christmas, despite the fact that he was working from lunchtime on Christmas Eve until lunchtime on Christmas Day.  I had the most relaxed Christmas for over thirty years, while poor Tom just never stopped as there was still very little I could do one-handed.  I was very pleased with myself though because I managed to stuff the turkey and get it into the oven myself, and also managed to make the bacon rolls - and once Tom had cut up my dinner for me I had little trouble eating it!  Anyway, enough about that and down to business!

This morning I took the bull by the horns and had a scout around in my craft room to see if there was any way I could actually do any crafting.  I came across a set of Humphrey decoupage that I had already printed and cut out before I broke my wrist.  I had even stuck some of the decoupage together so, usimg my guillotine very carefully with my elbow I managed to cut out the base image and also some of the backing papers and turned it all into a card - a very simple card - but a card nonetheless!  Thank goodness for Collal Photo Glue!

  
I didn't have a sentiment for it so took one of the Card Companions sheets into Craft Artist and digitally cropped the sentiment from it, added a blue border and printed it onto Neenah card and then, using my guillotine as before, carefully cut it out and stuck it to the card front with some foam tape. 

I had already decided, when frantically making Christmas card inserts in order to get the cards into the post, that I was going to design the inserts for every card I make at the time I make the card, even if I don't print it and put it into the card until later, so I designed an insert in Craft Artist.  I haven't printed it and put it into the card - I will do this when I know the recipient and that way the text can be personalised accordingly.  Here is a photo of the insert
So I now feel a bit happier as I have missed my crafting dreadfully and have been extremely bored - there is a limit to how much tv I can watch and how many books I can get through.  I even had to stop looking at other blogs and crafting groups because I was getting so frustrated at not being able to do anything myself.  I think I will have to be a bit careful though as I don't want to overdo it and set myself back.

Thank you for visiting my blog.

Catherine x