Wednesday 30 November 2011

Hunkydory Pearly Petals cards

Good evening everyone

Well, I've had another buys day and not a lot of time for crafting.  Hubby is on his days off so we had things to do and I'm pleased to report that the turkey is now ordered!  I have started to sort through all the Christmas cards I have made and decide who I am going to send each one to so have started making the appropriate inserts and sentiments for them.  Some of them need to go into the post in the next couple of days as they have to travel around the globe!

Anyway, all I managed to do card-wise today (apart from inserts and sentiments) was put together two cards very quickly.  They are from the Hunkydory Pearly Petals range and I have had them for quite some time.  I did make up the decoupage a few weeks ago so finished the cards today.  I have simply made them up as supplied as I didn't really have time to add any extras - the front of these cards is dome shaped.

Here they are:


When I made up the decoupage I added some crystal glamour dust to the flowers, but I think that was a mistake because I am not really keen on it on these particular cards.

And so, back to sorting out my Christmas cards!

Thank you for dropping in.

Catherine x

Tuesday 29 November 2011

A couple of Dufex Christmas cards

Good evening everyone

Just a quick post this evening.  I haven't managed to make a card today so thought I would share a couple of Dufex Christmas cards I made a year or so ago - not quite sure when to be honest, but both of them used the same image.


This was A5 in size and the base card was made from Stardream card.  The topper is from Dufex and has been matted and layered onto mirri card and more Stardream card.  The sentiment was cut using a Spellbinders die.  The border down the right side was done using an embossing board (Glitter Girls I think) and I cut this away down the right side.  I then embossed the border again onto some gold paper and cut out the central ovals and glued them into the border on the card.  I added a border peeloff the the left side of this fancy border. The border on the left I did by embossing a line down the card and then adding peeloff borders either side of it.  Some corner peel offs on the central panel completed the card.


Again this was A5 in size and the base card was made from Stardream card.  The holly borders on this card were done with a Fiskars punch.  I had had this punch from my very first cardmaking days and was gutted when I managed to break it last year.

So two different cards with the same image - personally my favourite is the first one, which I made for my hubby.

Thank you for visiting my blog.

Catherine x

Monday 28 November 2011

Amelia's Wish

Hello folks

Today's card is actually one I made a couple of days ago, using another "Amelia" pre-coloured digi-stamp from the Polka Doodles cd "Pretty Sweet"  (so if you think my colouring has improved it's probably because it was most likely coloured by Nikky Hall!)  I took this cute image into Craft Artist, added backing paper from "Simply Sweet" (I changed the transparency so that it doesn't take from the image), some flowers, a butterfly and a bird from various Daisy Trail Digikits and it looks as though Amelia is sitting amongst the flowers talking to the bird.

Here is the card:


The base card is a pre-scored 6x6 card blank and I have matted and layered using Coredinations card from Crafters Companion and a backing paper from the cd "Pretty Sweet".  I finished the card with a sentiment I also printed from the cd and cut out using a Spellbinders nestie. 

 Here's a close up of Amelia:


I am very pleased with the way this card turned out and really love these digi stamps from the cd.  It is a godsend to have pre-coloured images when time is in short supply for colouring them myself.

Thank you for visiting my blog.

Catherine x

Sunday 27 November 2011

Xmas Goodies Cards

Hello everyone

This morning I have made three quick little Christmas cards from the cd "Xmas Goodies" from Fee J Designs.  I bought this cd on impulse last year but had all my Christmas cards sorted by then so didn't actually use it.  So this morning I had a look through it and decided to make three quick cards.  These cards appear on the cd as 8x8 card fronts, but I have resized them in Craft Artist to aprox 5x5 instead.  They still look the same!

Here is the first one:


I printed direct onto card and also printed off the snowman and the border separately, cut them out, added a bit of starlight pen and crystal glamour dus and then added them to the card using foam pads under the head of the snowman and Crafters Companion tape pen to the border and base of the snowman.  I designed and printed the insert using Craft Artist.
Second card:


Again I printed direct to card and also printed off the square topper and the border separately.  The topper got the Crafters Companion spray and sparkle treatment and I outlined the border using starlight pens, though I don't think this shows on the photo.  I stuck the topper down using foam pads and Crafters Companion tape pen for the border.  I designed and printed the matching insert using Craft Artist.

Third card:


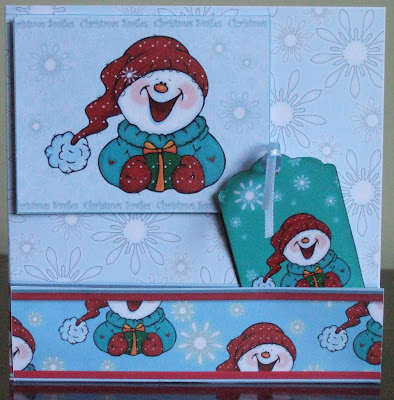
Again printed this direct onto card with the topper, tag and boder separately.  The topped was given the Crafters Companion spray and sparkle treatment and I punched a hole in the top of the tag and added a fine piece of blue ribbon.  I used foam pads to add the topper and a mixture of foam pads and Crafters Companion tape pen for the border so that I could simply slot the tag into it.  Again, I designed and printed the insert using Craft Artist.

And here are the first ten of the cards I made yesterda morning:


You may already have seen my post when I first designed this card on Craft Artist and this is what it looks like printed out.  If time allows I may add a little glitter to them before putting them into the post.

And the second ten made yesterday morning - five of each design:


Both of these were also designed using Craft Artist and printed direct to card,

So I have had quite a productive weekend, which is just as well because I think that tomorrow I may be in the kitchen for quite some time.  Hubby has already made the Christmas Puddings (yep, puddings in the plural - six of them to be exact) so it is now my turn to make the Christmas cake (that's what I call a division of labour!)

Thank you for dropping in.

Catherine x

Saturday 26 November 2011

Joy To The World

Good evening everyone

This morning I had a batch card making hour or so and managed to make 20 Christmas cards so I'm nearly there - and for once in plenty of time.  Then I made one more card to celebrate!  I coloured two of these images together a couple of weeks ago and have already shown you the first card I made.  This time I wanted to make a completely differend style of card - clean and neat and tidy!  Here it is:


The base card is a pre-scored white 5x7 card blank.  I have matted and layered using green and red Coredinations card from Crafters Companion.  The stamp is from the Moments in Time series from Flowersoft and is called "The Singers".  This was stamped onto Neenah card from Crafters Companion and I have used FlexMarkers and ProMarkers to colour it.  I outlined the image very lightly using honeydew FlexMarker but unfortunately it doesn't show up too well on the photograph.  Finally I stamped the banner sentiment which came with "The Singers" using green Versamark and heat embossed it with clear detail embossing powder, and then coloured it lightly with Flex and ProMarkers.  I have to say that I am not too sure about the banner.  The rest of the card is exactly as I wanted it to be - green, red and white - good old Christmas colours.

I have discovered that this week's challenge over at Polka Doodles is "Italian Christmas" - ie using white, red and green so as this card fits that bill I think I will enter it.  The Challenge at the I Love ProMarkers Challenge Blog is "Anything Goes" so I think I will enter this card there too.

Thank you for dropping by.

Catherine x

Friday 25 November 2011

Amelia's Garden

Evening everyone

Today I have made a relatively quick card using a really cute image from the Pretty Sweet cd by Polka Doodles.  I didn't have time to colour it so used one that was pre-coloured.

Here is the card


This sweet young lady is called Amelia and I took her into my Craft Artist, having first checked the small print on the cd to make sure that it was ok to do so, and sat her on a bench.  I then added some flowers, a butterfly, bee and watering can - et voila Amelia sitting in her garden having a break from watering her flowers!  Here is a close up:


 I cut out Amelia using a Spellbinders die and matted her onto an oval of Coredinations card from Crafters Companion.  I have used more Coredinations card and some backing paper from the Pretty Sweet cd as mattes.  The sentiment was printed from the cd also, but was in a different colour so I cut out the centre and mounted it onto more Coredinaations card to match the rest.  I finished the card by making a border, punched with a MS punch and with a piece of ric rac down the centre.

Thank you for visiting my blog.

Catherine x

Thursday 24 November 2011

SWALK The Kiss

Good evening folks

I love the SWALK rubber stamps from Crafters Companion and am gradually working my way through colouring each of the stamps I now own.  I coloured this image a couple of weeks ago and it has been sitting waiting patiently to be made up into a card!  So here it is:


The base card is a pre-scored 200mm square card blank and the two papers I have used for this card are both from the "Daisy Chain" section of the Word Books cd by Funky Hand.  I have printed the green backing paper onto Centura Pearl snow white card from Crafters Companion.  The stamped image has been coloured with FlexMarkers and ProMarkers and then cut using a Spellbinders die.  I have threaded the ribbon through this and attached it to the reverse of the green card.  The heart and the small flourishes are also cut using Spellbinders dies and I have gone lightly around the edge of the heart with a glue pen and a light sprinkling of crystal glamour dust.   Three small gems, a rose and the Love embellishment are all from my stash.  Unfortunately the daylight had gone by the time I got to make this card this afternoon and, despite using an Ottlite, the photograph looks quite dark.

Wednesday 23 November 2011

Let it Snow, Let it Snow, Let it Snow

Hello everyone

I've been a bit busy in the last few days so not a lot of time to spend on my pc.  I still have cards in the making which I won't be able to share immediately but today I am going to share a card I made for the monthly challenge at Crafters Companion, which is "Let it Snow, Let it Snow, Let it Snow!  I think there is plenty of snow on this card:


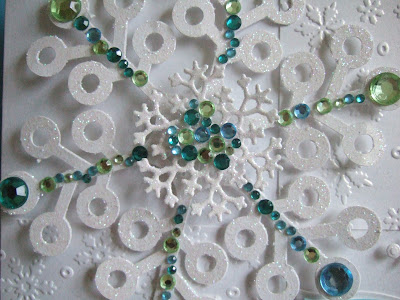
This card is 190mm square and the base card is made from Centura Pearl snow white card from Crafters Companion.  The two embossed squares are also Centura Pearl card which have been embossed using the snowflake embossing folder by Darice.  The large snowflake has been cut on my Craft Robo from Centura Pearl card (no mean feat I can tell you!) and then sprayed with Crafters Companion stick and stay and liberally dusted with crystal glamour dust.  The centre of the snowflake was cut using a die from Marianne's creatables and given the same stick and stay and glamour dust treatment.  I have then added some bling - these were a set of gems I bought at a craft fair last year and came in clusters so I have tried, where possible, to keep them in their clusters.  Here is the snowflake before assembly:


I stuck a piece of foam tape to the reverse of the the large snowflake in order to lift it slightly off the card, although I actually stuck it down using glue gel.  I also added a foam pad to the reverse of the smaller snowflake which forms the centre of the larger one once assembled.  This centre snowflak and also the other three smaller snowflakes were cut using Marianne's Creatables dies.

A close-up of the finished snowflake:


The sentiment was computer generated and the text was curved to fit the shape of the Spellbinders die which I used to cut it.  I then layerd it up to look like a book and added a piece of ribbon from my stash down the centre.


And that completed my very snowy card!  I hope you like it.

I have decided to enter this card into the following challenges

Crafters Companion Monthly Challenge  - Let it Snow, Let it Snow, Let it Snow
Crafty Emmas  - Snowflakes
Hooked on Craft   - Something Punched
Crafty Catz   Snowflakes

Thank you for visiting my blog.

Catherine x

Tuesday 22 November 2011

Quick Birthday Card - Tatty Teddy

Good evening everyone

Well I'm very late posting my card for today - but better late than never!

This afternoon I made a very quick Tatty Teddy birthday card using a topper and backing papers from the "Me To You" cd from Docrafts.  The only addition was a piece of Coredinations card from Crafters Companion.

Here is the card

The flourish was cut using a Cheery Lynne die which I bought recently at a craft fair and this was it's first outing!  The rose was also a craft fair purchase but I have no idea of the manufacturer as it was in an unmarked pack.

Just a short post tonight - think it's time for my beauty sleep!

Thank you for calling in.

Catherine x

Monday 21 November 2011

The Singers

Good evening folks


Over the weekend when I was busy making my last batch of Christmas cards I was also doing some colouring with my FlexMarkers and ProMarkers and this afternoon I have turned one of the images I coloured into a Christmas card.

This lovely image is called "The Singers" and is from the Moments in Time series by Flowersoft.  I have previously used another of the Moments in Time stamps and loved colouring it so much that I just had to have another one.  That stamp was called "Let is Snow" and the two cards I made with it can be found on my posts of 29 September and 21 August.  Anyway, back to today's card and here it is:


The base card is a 200mm square pre-scored card blank.  I have used Anitas gold foil paper, Stardream red paper  and some patterned backing paper from a Hot Off The Press paper stack which was a freebie with a magazine I bought a couple of months ago.  The image was coloured with a mixture of FlexMarkers and Promarkers on 250gsm Supersmooth white card from Samuel Taylors which I got at a craft fair recently.  I thought it looked a little stark because the card is very white so went lightly over it with FlexMarker in watermelon.  I then used a shaving brush to ink around the edges using Tim Holtz distress ink in peeled paint. The card was finished with a poinsetta and some card candi.  I don't think the photograph actually does the card justice because it looks far more vibrant in reality.

I have decided to enter this card into the following challenges:

Just Inspirational Challenges
The Crafty Pad  (Festive Cheer Inspiration - red, green and gold/silver)
Kaboodle Doodle Challenge  (Baby it's cold outside)

Thank you for visiting my blog

Catherine x

Sunday 20 November 2011

A Christmas Wish cards

Good evening folks

Well I didn't manage to post to my blog yestereday.  I was making some Christmas cards and also doing a bit of colouring practise but the daylight disappeared too quickly for my liking!  Anyway I put the finishing touches to the cards this afternoon so thought I would show them to you this evening.

All of these cards were made using the cd "A Christmas Wish" from Cupcake Crafting.  I had previously printed off some toppers and backing papers from this cd and decided it was time I made some of them up into cards.  I designed my own inserts for the cards using Serif Craft Artist.  I could have printed off inserts from the cd but wanted the papers on the inserts to match each individual card.
I used computer generated sentiments and some card candi to finish off the cards.
Here are the first two


Here is an example of a colourful matching insert


Some more square ones


And finally three A6 ones


That's it for this evening - I haven't had much time to be online this weekend - hubby is on his day's off so I don't know where the time goes to.

Thank you for dropping in.

Catherine x

Friday 18 November 2011

SWALK Christmas Card 2

Evening everyone

Well now that I have come back down to earth after winning last week's challenge in The Crafty Bloggers Network I thought I would post another SWALK Christmas card that I made yesterday.  This is such a cute image too.


The card base is a pre-scored 6x6 card blank and I have matted some purple mirri card and some backing paper from the SWALK winter cd from Crafters Companion.  The cute image has been coloured using both FlexMarkers and ProMarkers and cut out with a Spellbinders scalloped oval.  I have coloured the edges of this using Tim Holtz distress ink in milled lavender and then added a layer of Spray and Sparkle in iridescent from Crafters Companion.  The topper was layered onto a second scalloped oval, this time made from purple mirri card and embossed using my Darice snowflake embossing folder.  I have added some fine ribbon and  bows, a computer generated sentiment and card candi to complete the card.  As this card has two penguins, two scalloped ovals, two ribbons, two bows, two matts and two pieces of card candi I think it should fulfil the requirements for this week's challenge over at The Crafty Bloggers Network

Thank you for visiting my blog.

Catherine x

Thursday 17 November 2011

SWALK Christmas card 1

Hello everyone
 
Today I am posting the Christmas card I made yesterday - just needed to add the sentiment this morning.  For this card I have used one of the lovely SWALK rubber stamps from Crafters Companion, which I have coloured using Flexmarkers and Promarkers.  Here is the card:


I have used a pre-scored 6x6 card blank and some silver mirri card with backing paper printed from the Crafters Companion SWALK winter cd.  I had to change the colour of this slightly as I coloured the image first and wanted a toning backing paper.  I have used a white gel pen to highlight the falling snow, silver moonlight glitter pen to the large snowflakes and a touch of iridescent glitter to the pom-pom on the hat and fur trims on the coat.  I cut the image using a Spellbinders die and then layered it onto Centura Pearl snow white card cut with another Spellbinders die.  The sentiment is computer generated in Serif Craft Artist and then cut with a Spellbinders die.  I can't quite decide whether or not this card needs something extra - I don't like to over-embellish my cards but think that perhaps there is "something" mising!  What do you all think?

Thank you for stopping by to visit my blog.

Catherine x

Wednesday 16 November 2011

Centura Pearl Christmas Cards

Evening all

This evening I would like to share some Christmas cards I made at the weekend using up offcuts of Centura Pearl snow white card.

Here are three of them - virtually identical.  I used a Darice snowflake embossing folder direct onto the card base, added a length of ribbon and a poinsetta, all from my stash.  I then printed out the sentiments and cut them out using Spellbinders dies.


I used three different dies and resized the sentiment in Craft Artist Professional to fit each individual die.  It actually took me much longer to decide on what font to use for the sentiments than it did to make the rest of the cards.

Here is another one - a larger offcut this time.


This was made in exactly the same way as the previous three but I added a sentiment I had saved from a Christmas card I received last year, and I also added a small drop of stickles glitter glue to some of the embossed snowflakes.  So I suppose you could say I was recylcing on this one!

Thank you for calling in to visit my blog.

Catherine x

Tuesday 15 November 2011

A couple of cards with inserts

Hello everyone

Well I didn't make it as far as my craft room today - I think my system is still in shock after spending a lot of time doing housework yesterday!

So this evening I am going to show you two cards plus matching inserts that I have designed while playing with Craft Artist.  Both of these cards have yet to be printed and made up.  Here's the first one

This is the card front and was entirely made from one of the Daisy Trail (Serif) digikits - Winter Greens.  Here is the matching insert


Here is the second card front

The flower image on this card is taken from My Craft Studio artwork - Tattered Lace.  All other elements are from the Daisy Trail digikits.  Here is the matching insert


I haven't yet decided how I am going to make up these two cards - I may print out extra layers of certain elements and layer them up, or I may just print them straight onto a card base but add a bit of glitter.  I may even leave them "as is".  I will decide that when I know who the recipient is going to be.

Many thanks for stopping by.

Catherine x

Monday 14 November 2011

Digital Paddington Bear Christmas Card

Evening everyone

I haven't had a chance to do any crafting today - I really needed to catch up on some housework.  I didn't actually get as much of that done as I had intended, but I did have a nice chatty doggy walk this morning, a bit of a chat to my neighbour and some unexpected (but extremely welcome) visitors.  So in the middle of all this activity I took delivery of my Christmas present from hubby (which I am not allowed to have until Christmas) - only to realise about ten minutes later that the company had sent the wrong model.  After a couple of attempts to get them by phone I succeeded and they have arranged for a courier to collect the package to return it to them tomorrow and the correct model will be despatched as soon as possible.  Ah well, tomorrow is another (crafty?) day!

So this evening I thought I would share a digital card with you.   I haven't actually got as far as printing this out as yet, but designed it on Serif's Craft Artist Profession over the weekend.   Actually, when I say designed, well that is probably too grand a term for it.  It was the first time I had looked at this digikit so was really just having a very quick play with it.

Here it is


All the items I have used to produce this digital card are from the digikit "Paddington in Winter" which is one of the cds in the triple cd collection "Paddington Collection Vol 1" from Create and Craft Design Suite.  The Design Suite is actually Serif's Craft Artist so it looks likely that Create and Craft will be bringing more of these digikit cds out in their own brand name.

Thank you for visiting my blog.

Catherine x

Sunday 13 November 2011

Girlie Baby Card

Hello again folks

Thought I would post early today as I made this card yesterday and managed to get a photograph of it in daylight!  It's another SWALK baby card, using the same stamped image I used for the SWALK new baby card I posted on 8 November, which was done in "boy" colours.  Both were coloured with my FlexMarkers and ProMarkers.  So without further ado, here it is.


The base card is a 6x6 pre-scored card blank and I have used pink duo card from Crafting UK and a Martha Stewart punch for the mats.  The flowers and ribbon are from my stash and the button was a freebie I got in a goody bag at a craft fair some time ago.  I finished the card by adding little gems to the centre of the flowers.

Thank you for dropping by.

Catherine x

Saturday 12 November 2011

Decoupage flowers and hand embossing.

Afternoon all

This morning I have made a card using hand embossing.  By that I mean that I have manually embossed card and paper using a ball tool and my Fiskars Scrap Boss.  I haven't played with this for some time - now that everyone has machines that emboss using dies and embossing folders the old ways tend to get forgotten.  Of course machines give a very crisp embossed finish to your card whereas the finish tends to be a little softer when done by hand - depending on how light or heavy a touch you have!

Here is the finished card


I started by embossing a square of Centura Pearl snow white card, using the Fiskars stencil called "Serenity".  Centura Pearl is about 300gsm so quite a heavy card to emboss.  I then went around the edges lightly using dusty concord distressing ink by Tim Holtz.  I decided that decoupaged flowers would fit into the central oval and these ones are from Hunkydory - I omitted the oval base layer.  The backing paper I used is one I made myself using metallic marbling inks from Crafting UK - I had an afternoon being very messy in the kitchen a couple of months ago and all the papers are now bone dry and useable!  I embossed the right side and bottom of this piece using the same embossing stencil and then mounted both it and the topper onto gold mirri board.  The card base is a 8x8 pre-scored card blank which I distressed around the edges using dusty concord again.  Finally I made a computer generated sentiment on Centura Pearl card, cut it with a Spellbinders die and went around the edges with dusty concord.  I mounted it onto another piece of marbled paper, also embossed with the serenity stenci,l and made a border with purple ribbon.  Finally I mounted it onto more gold mirri card.

Thank you for visiting my blog today.

Catherine x

Friday 11 November 2011

Pink, Purple and Green

Good evening everyone

I have never made a card specifically to enter into a challenge before.  In fact I haven't entered many challenges at all.  This week the challenge at Crafty Bloggers Network is to make something using the colours pink, purple and green.  So I put my thinking cap on and tried to come up with an idea using these three colours.  I like colours to blend and tone together when possible and I finally decided that flowers would be perfect for these three colours.  So I had a good look through my decoupage sheets and crafty cds but just couldn't find anything I felt would work.  Soooo - with great trepidation - I got out my trusty Sheena Douglass' paint fusion daisy rubber stamps.  Now I still haven't got round to trying paint fusion so it was FlexMarkers and ProMarkers to the ready.  Something else I haven't done before is to colour flowers so I hope you will all be kind to me!  I drew the stalks in freehand (not a very good job methinks).  Anyway, without further ado, here is my finished card for the challenge.

The base card is a white pre-scored 6x6 card blank and I have used a backing paper from my Funky Word Books cd by Funky Hand.  The background to the daisy topper has been coloured in lightly with "Honeydew" FlexMarker and then I have distressed the edges using Tim Holtz' distress ink in dusty concord.  The topper was mounted onto a piece of Centura Pearl snow white card from Crafters Companion and then I have gone around the edges with more dusty concord distress ink.  The sentiment was computer generated and is a quote from the poem "To the Daisy" by William Wordsworth.  I coloured around the text lightly with honeydew FlexMarker and again lightly distressed the edge with dusty concord distress ink before mounting it onto more Centura Pearl snow white card and edging it with more dusty concord.  I finished the card with some card candi.

Thank you for calling in to visit my blog.

Catherine x

Rememberance Day

Good morning everyone.

Today I am posting something that isn't a card, but something I have designed on Serif's Craft Artist Professional and which contains some of my family history.  Today is Rememberance Day, Armistice Day, Poppy Day - different names but all meaning the same thing - a time to remember all those men and women who have given their lives in the service of their country since 1914.  In my own family this includes relations from my own generation, my parents' generation and my grandparents' generation - all but one of them only in their twenties.  And I am sure that this will be echoed by other people the country over.

"We will remember them."


The image and backing paper I have used to make this are from one of Joanna Sheen's cds.
Thank you for visiting my blog.

Catherine x

Wednesday 9 November 2011

Parchment Birthday Card

Evening everyone

Tonight I thought I would share a card I made some time ago as I haven't completed any new cards today.  Been colouring with my ProMarkers again for a while this afternoon.  Hopefully I will get some cards done tomorrow.

Anyway I made this card from my friend's 60th birthday, and I had quite a few attempts at doing it because I kept losing count when I was doing the gridwork, so it took me quite a while to do.  Here's the card


The Centre panel was made using a rubber stamp from Joanna Sheen which was heat embossed on the front of the parchment.   I then embossed the back of the parchment using a ball tool around the edges and in the centre flowers, and then added some pearls.  This was matted onto another piece of parchment which I had pricked and embossed using a grid (which is where I had the problems!).  I didn't work from a pattern, which is why the design is very simple!  I designed it so that I could thread ribbon along the borders at the top and bottom of the card, and then added pearls down the two side borders.  I attched this to a piece of pink mirri card using brads in the corners and then attached this to a plain white card base.  I finished the card with a parchment flower, which I made following a pattern and a couple of peel-offs.

I am pleased to report that my friend liked her birthday card.

Thank you for visiting my blog.

Catherine x

Tuesday 8 November 2011

Swalk New Baby Card

Good evening everyone,

Well I have finally got to post something again after a couple of days absence.  I have been trying to get time to play each day but really had to tackle the ironing mountain yesterday.  I am pleased to say I managed to completely demolish it - for now anyway.

Today has been a very damp, cold and dark day here.  I did some colouring practise this afternoon but to be honest I was having difficulty seeing what I was doing, even with the light on.  I suppose that's how it's going to be for the winter.

Anyway, I made this card this evening.  I had already coloured the image so it was just a case of putting it all together, which would have been a lot quicker if I didn't dither so much!  Anyway, here it is:


I have to say that this isn't the best photograph as it was taken in artificial light but I suppose that's something else I'm going to have to put up with for the winter.  Anyway, the card is A5 and the card base is made from snow white Centura Pearl from Crafters Companion.  The stamp is one from the SWALK collection also from Crafters Companion, and I have coloured it using FlexMarkers and ProMarkers.  I have used Spellbinders dies to cut and layer the image,  the pale blue lace backing paper is from Joanna Sheen,and the blue ribbon is from my stash.  The little blue flowers were a freebie in a goodie bag at a Craft Fair some time ago and I have added a little gem to the centre of each.  The card was finished with three blue gems from my stash.

Thank you for calling in.

Catherine x
Saturday 5 November 2011

A couple of Tatty Teddy cards

Evening all

Well, I haven't managed to make any new cards today, but have been busy making inserts for some of my Christmas cards, now that I have started "designating" them.  So I thought I would share another couple of Tatty Teddy cards I made earlier in the week.  All the images and backing papers I used are from the Docrafts "Me To You" Tatty Teddy cds.

The first one is a little birthday card
.
This is a 5x5 card.  The whole card front was  printed  onto 300gsm supersmooth card from Samuel Taylors and then cut to size using a wavy rotary cutter. I then printed another copy onto Supersmooth Decoupage paper from Crafting UK.  Tatty Teddy, the small flower and the bow were then cut out and added to the printed card base using foam pads.  Some glitter in the centre of the flower finished the card.

The second card this evening is a Tatty Teddy wedding card

Like the first card, this was designed in Docrafts Digital Designer and then printed out onto 300gsm Supersmooth card from Samuel Taylors.  Although the photograph doesn't really show it, I glittered the swirly bits on the front and also the light areas on the heart.  I then added a matching insert.

Thank you for vising my blog.

Catherine x

Friday 4 November 2011

Some quick digital cards.

Evening people

This evening I thought I would share some quick cards I made using my Craft Artist Professional.  I send quite a lot of Christmas cards in the post and thanks to the crazy way the postage is calculated these days, virtually every handmade card I make has to go as a large letter.  So when it comes to sending a lot of cards via Royal Mail I just print many of them.  So here are some of the ones I have made so far this year, inserts and all!

This is a 5x5 card designed using the digikits in Craft Artist, as was the insert.  Once you decide what you want it is simply a case of printing and assembling!  I just couldn't resist the cute and innocent characters and animals I used for this card and the second card below. The following two cards were done in the same way.
I often add little touches to the card fronts once they have been printed eg glitter, ribbon, peel-offs etc - as long as they don't increase the depth of the card beyond 5mm and make it weigh more than 100g!

While I was playing with Craft Artist I also decided to try and make another tri-fold cutout card.  I made it smaller this time and used images and backing papers from my cd "Art Deco Delights" by Rob Addams.  I also remembered how hard it was to cut the 300gsm card I used last time so changed to 250gsm this time, and it was definitely easier to cut through (I'm not great with a craft knife when it comes to fiddly bits!)  So here is the card

I think it could probably do with something added to it to bring it to life a bit but can't quite put my finger on what!  Maybe I need a more glamorous image!

Thank you for calling in.

Catherine x