Tuesday, 13 December 2011

My son's birthday card

Morning everyone

Well it has been a week sine my last post and it's now eight days since I fractured my wrist.  So I haven't actually made any cards since, although I have to confess to using my guillotine with my elbow yesterday to trim a few Christmas card inserts so that I could get the cards ready for the post.  And I gave hubby his first papercrafting lesson.  I don't think he cares much for double sided tape somehow - there was a great deal of muttering about going to the shop and buying a box of cards!  But he did a really good job, as I knew he would.

Today I would like to share with you a card I made a couple of weeks ago but have had to keep under wraps because it was for my son's birthday, which is today.  Here is the card


This cute little fella owns my son and his girlfriend and I took this photograph back in September when we visited them.  To make the topper I first took the photograph into my Corel Painter Essentials and converted it into an oil painting and then took it into Serif Craft Artist and added the page curls.  I then added all the other embellishments including the hessian background and little pawprints from digikits - the embellishments I know were in the Daisy Trail "Furry Friends" digikit.  I printed this out onto gentle gloss paper from Joanna Sheen and then matted and layered it onto Coredinations cardstock from Crafters Companion and some copper coloured embossed foil card which I have had forever and originally came from Create and Craft.  The corners were cut from Coredinations card using a Sprllbinders die.

And for once I actually remembered to take a piccie of the insert:


 This is the sort of card my friends and family know me best for - a very personalised one.  I hope you have enjoyed looking at it.  I know my son likes it, and that's what counts!

Thankyou for dropping in.

Catherine x

Tuesday, 6 December 2011

21st Birthday Card

Hello everyone

On Monday afternoon I slipped on a muddy path while out walking Paddy and landed very heavily and awkwardly on my right wrist which resulted in a fracture so I am typing this very slowly and laboriously with my left hand (I am right handed - typical!).  So I think that my crafting will be at a bit of a full stop for the time being.  It is Monday evening as I am writing this and I will schedule this to post Tuesday morning.

It was my nephew's 21st birthday on Saturday so just want to share the card I made for him.  Since he was very young Aaron has loved elephants and I always try to either make him an elephant themed birthday card or else sneak one into the card somewhere.  So when I saw these rubber stamps I immediately thought of him!


The rubber stamps are Humphrey's Corner stamps from Crafters Companion and I have coloured them using FlexMarkers and ProMarkers, and Starlight pens for the confetti.  I then cut out the two stamps and fitted them together to make one long conga chain, sticking them to another piece of Neenah card from Crafters Companion.  I have then matted this onto a square of Coredinations card and a larger square of Anitas gold foil paper.  I cut a balloon shape and the numbers on my Craft Robo, added some multi-coloured Spray and Sparkle from Crafters Companion to the balloon and then added it to the card with the numbers stuck onto the balloon.  I was very pleased with the finished result and think my nephew liked it!

Thank you for visiting my blog.  I will be back again as soon as I am able!

Catherine x

Monday, 5 December 2011

Winter Lady

Good morning everyone

As some of you will know, I went Christmas shopping on Thursday and when I got home I discovered that I had somehow managed to buy a couple of craft magazines amongst all that Christmas shopping.  Oops - wonder how that happened?  One of the magazines, "Making Cards" had some free papers in it, including some of the Nancy Watt Collection "Winter Ladies" which I absolutely love.  So yesterday I cut into some of it and made this card.


The card base is a 6x6 prescored card and the paper and topper were part of the free papers.  I cut the topper using a Spellbinders die because I am severely scissorly challenged when it come to cutting out circles!  The die was very slightly larger that the topper so I used a glue pen on the white area and glittered it.  It also served to cover up a very small area at the base of the topper where the die had cut into the next image on the page!  The backing paper and topper were both layered onto silver embossed foil card cut with Spellbinders dies and which originally came from Create and Craft a number of years ago.  I have used it very sparingly over the years because I really like it!

The "jewel brooch" was another like the one I used on my Elegant Lady card.  I made this on Saturday evening but didn't have any holograhic card in a toning colour so used a ProMarker onto some silver card and then stamped the brooch.  To ensure that the ink really was properly dry this time, especially given the fact I had used a ProMarker on it too I sprayed it with Crafters Companion Spray and Shine to seal it before cutting it out.  The silver ribbon was from my stash, again years old, and the sentiment was also part of the free papers.

I really like this card, because I do love the topper and backing paper.  I am just SO glad that the magazine somehow found it's own way into my Christmas shopping!!!

Thank you for visiting my blog.

Catherine x

Sunday, 4 December 2011

"Let it Snow" third version

Good morning everyone

Yestereday evening I decided it was time to make my third Christmas card using the stamp from Flowersoft "Let is Snow".  When I first started to use character rubber stamps and learn how to colour using ProMarkers back in August, I stamped this image out three times and spent hours and hours and hours practising colouring it.  I ended up with three coloured images - two in shades of brown and one in red and green.  I have already made one brown one and the red and green one into cards and if you think I have used a very similar layout for all three cards you will be quite correct.  The reason I have done this is that I have three elderly aunts and I always make sure that I send them similar cards.  I have used different colourways for each card and tried to make them individual.  So without further ado, here is the third (and final) card using this adorable image.


The card base for this one is a pre-scored 8x8 card blank.  I have used Anitas gold mirri paper and Coredinations card to matt and layer.  I decided to use a lighter colour of Coredinations to make two of the squares and then embossed them using embossing folders, which I then sanded back and rubbed over lightly with Tim Holtz distressing inks.  The green paper I made using marbling inks a few months ago and these have been cut out using a Spellbinders die.  When I stamped this image I didn't allow any room around it on the sheet for cutting out with a die, so simply cut around the image, leaving a very small border and then stuck it onto some Neenah card which I had cut with a Spellbinders die. It was also given a very light spray of Crafters Companion spray and sparkle.   I then distressed around the image using more Tim Holtz distressing inks.  I finished this card using some card candi and some die cut poinsettas and snowlakes.

Now all I need to do is to decide which aunt gets which card - oh dear, decisions, decisions!  And just hope they actually like them when they receive them!

Thank you for dropping in.

Catherine x
Saturday, 3 December 2011

Brooch

Good afternoon folks

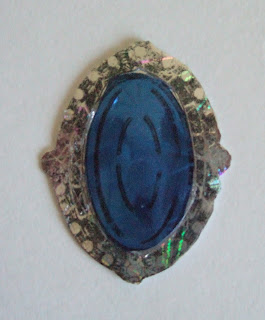
I have had so many comments about the brooch embellishment that was on my last post Elegant Lady and a request to know how it was made so I have - extremely quickly - made one.  I made it so quickly however that the ink wasn't properly dry so it has smudged so this example has now gone into the bin!  Having said that, it does show how it was made!

So, I used a rubber stamp from Joanna Sheen.  I have checked on the website and can't see these stamps so they may no longer be available.


This was the card I used on the original brooch - antique silver and bright pink holographic card, although it is difficult to see on the photograph.


Today I decided to use silver and blue holographic card. I stamped this out using black Stazon because I was stamping onto a very shiny surface. I stamped it once onto silver and once onto blue holographic card and then cut them out.. Here is the assembled brooch.  I couldn't quite remember how I had cut and assembled it last time so tried cutting the silver frame and layering it onto the blue but that didn't seem right.  So then I cut out the centre of the blue, shaped it so that it curved and layered it into the centre of the silver brooch, using a goodly dollop of Collal glue gel to give it height in the centre


Unfortunately the ink wasn't quite dry so as you can see it smudged a good deal!  I then added four small clear "gems" centre top and bottom and centre of both sides and some small dots of silver glitter glue to the other stamped "gems" around the frame, though I don't think I used gems on the original.  I always have difficulty seeing what I was doing when I am working with mirri and holographic card and when I uploaded the photo discovered I had missed some!  If I was making another of these to use on a card I would make sure my ink was dry and take a bit more time cutting, assembling and adding the glitter glue to it.

Anyway, I hope that answers all your questions about this "brooch".  And I am sure that any of you could make a better job of it than I did with this one!

Thank you for visiting my blog

Friday, 2 December 2011

Elegant Lady

Good morning folks

So, not only did I not manage to post anything yesterday, I didn't actually manage to do any crafting either!  I decided that as it was 1 December I had better make an effort to do some Christmas shopping and headed off into town.  I returned home hours and hours later with a very battered and bruised piece of plastic, absolutely whacked and with very sore feet!  The shops were busy and there were long queues everywhere and of course as I was dressed for a very cold day, I cooked inside the shops!  Never mind I got most of what I went for - thank goodness it only happens once a year!

This morning I thought I would share a card I made a number of years ago to give to a friend for her birthday.  This friend is quite an elegant lady so I thought I would make her a card with an equally elegant image, which is decoupaged.  I can't remember a lot of the details of this card because it was so long ago, but I do know that the backing paper came from Crafters Companion - it was a lovely silver/pink textured paper.


The "gem" on the front was made using a Joanna Sheen rubber stamp and silver and bright pink mirri card.

I have another busy day planned today but hopefully will actually get into my craftroom at some point!

Thank you for visiting my blog.

Catherine x