Good afternoon folks
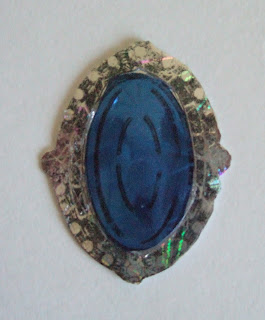
I have had so many comments about the brooch embellishment that was on my last post Elegant Lady and a request to know how it was made so I have - extremely quickly - made one. I made it so quickly however that the ink wasn't properly dry so it has smudged so this example has now gone into the bin! Having said that, it does show how it was made!
So, I used a rubber stamp from Joanna Sheen. I have checked on the website and can't see these stamps so they may no longer be available.
This was the card I used on the original brooch - antique silver and bright pink holographic card, although it is difficult to see on the photograph.
Today I decided to use silver and blue holographic card. I stamped this out using black Stazon because I was stamping onto a very shiny surface. I stamped it once onto silver and once onto blue holographic card and then cut them out.. Here is the assembled brooch. I couldn't quite remember how I had cut and assembled it last time so tried cutting the silver frame and layering it onto the blue but that didn't seem right. So then I cut out the centre of the blue, shaped it so that it curved and layered it into the centre of the silver brooch, using a goodly dollop of Collal glue gel to give it height in the centre
Unfortunately the ink wasn't quite dry so as you can see it smudged a good deal! I then added four small clear "gems" centre top and bottom and centre of both sides and some small dots of silver glitter glue to the other stamped "gems" around the frame, though I don't think I used gems on the original. I always have difficulty seeing what I was doing when I am working with mirri and holographic card and when I uploaded the photo discovered I had missed some! If I was making another of these to use on a card I would make sure my ink was dry and take a bit more time cutting, assembling and adding the glitter glue to it.
Anyway, I hope that answers all your questions about this "brooch". And I am sure that any of you could make a better job of it than I did with this one!
Thank you for visiting my blog


Brilliant x
ReplyDelete